Receiving a shipment
What this is
A receiving batch is one shipment from one supply partner. You create the batch, then add a line for each item in the boxes: how many arrived, the supply partner's transfer or PO reference, and the location you put it away in. While the batch is a Draft, nothing touches stock — you can add, change and remove lines freely.
Use this page when you're typing the lines yourself. If the supply partner sent a spreadsheet listing what's on the truck, let ConsignTrak build the batch for you instead — see Importing a stock-transfer spreadsheet.
Before you start
- Role: Office, Warehouse or Administrator. Supply partner users can see their own receivings in the portal but can't create them.
- Settings: none. The cost column on the lines table shows only when prices are turned on (see System configuration).
- You'll need:
- the supply partner set up;
- every item on the shipment already in the item master (see Inventory & items) — a part that isn't there can't be added;
- the bins or staging area you're putting stock into, set up under Locations.
Step by step
-
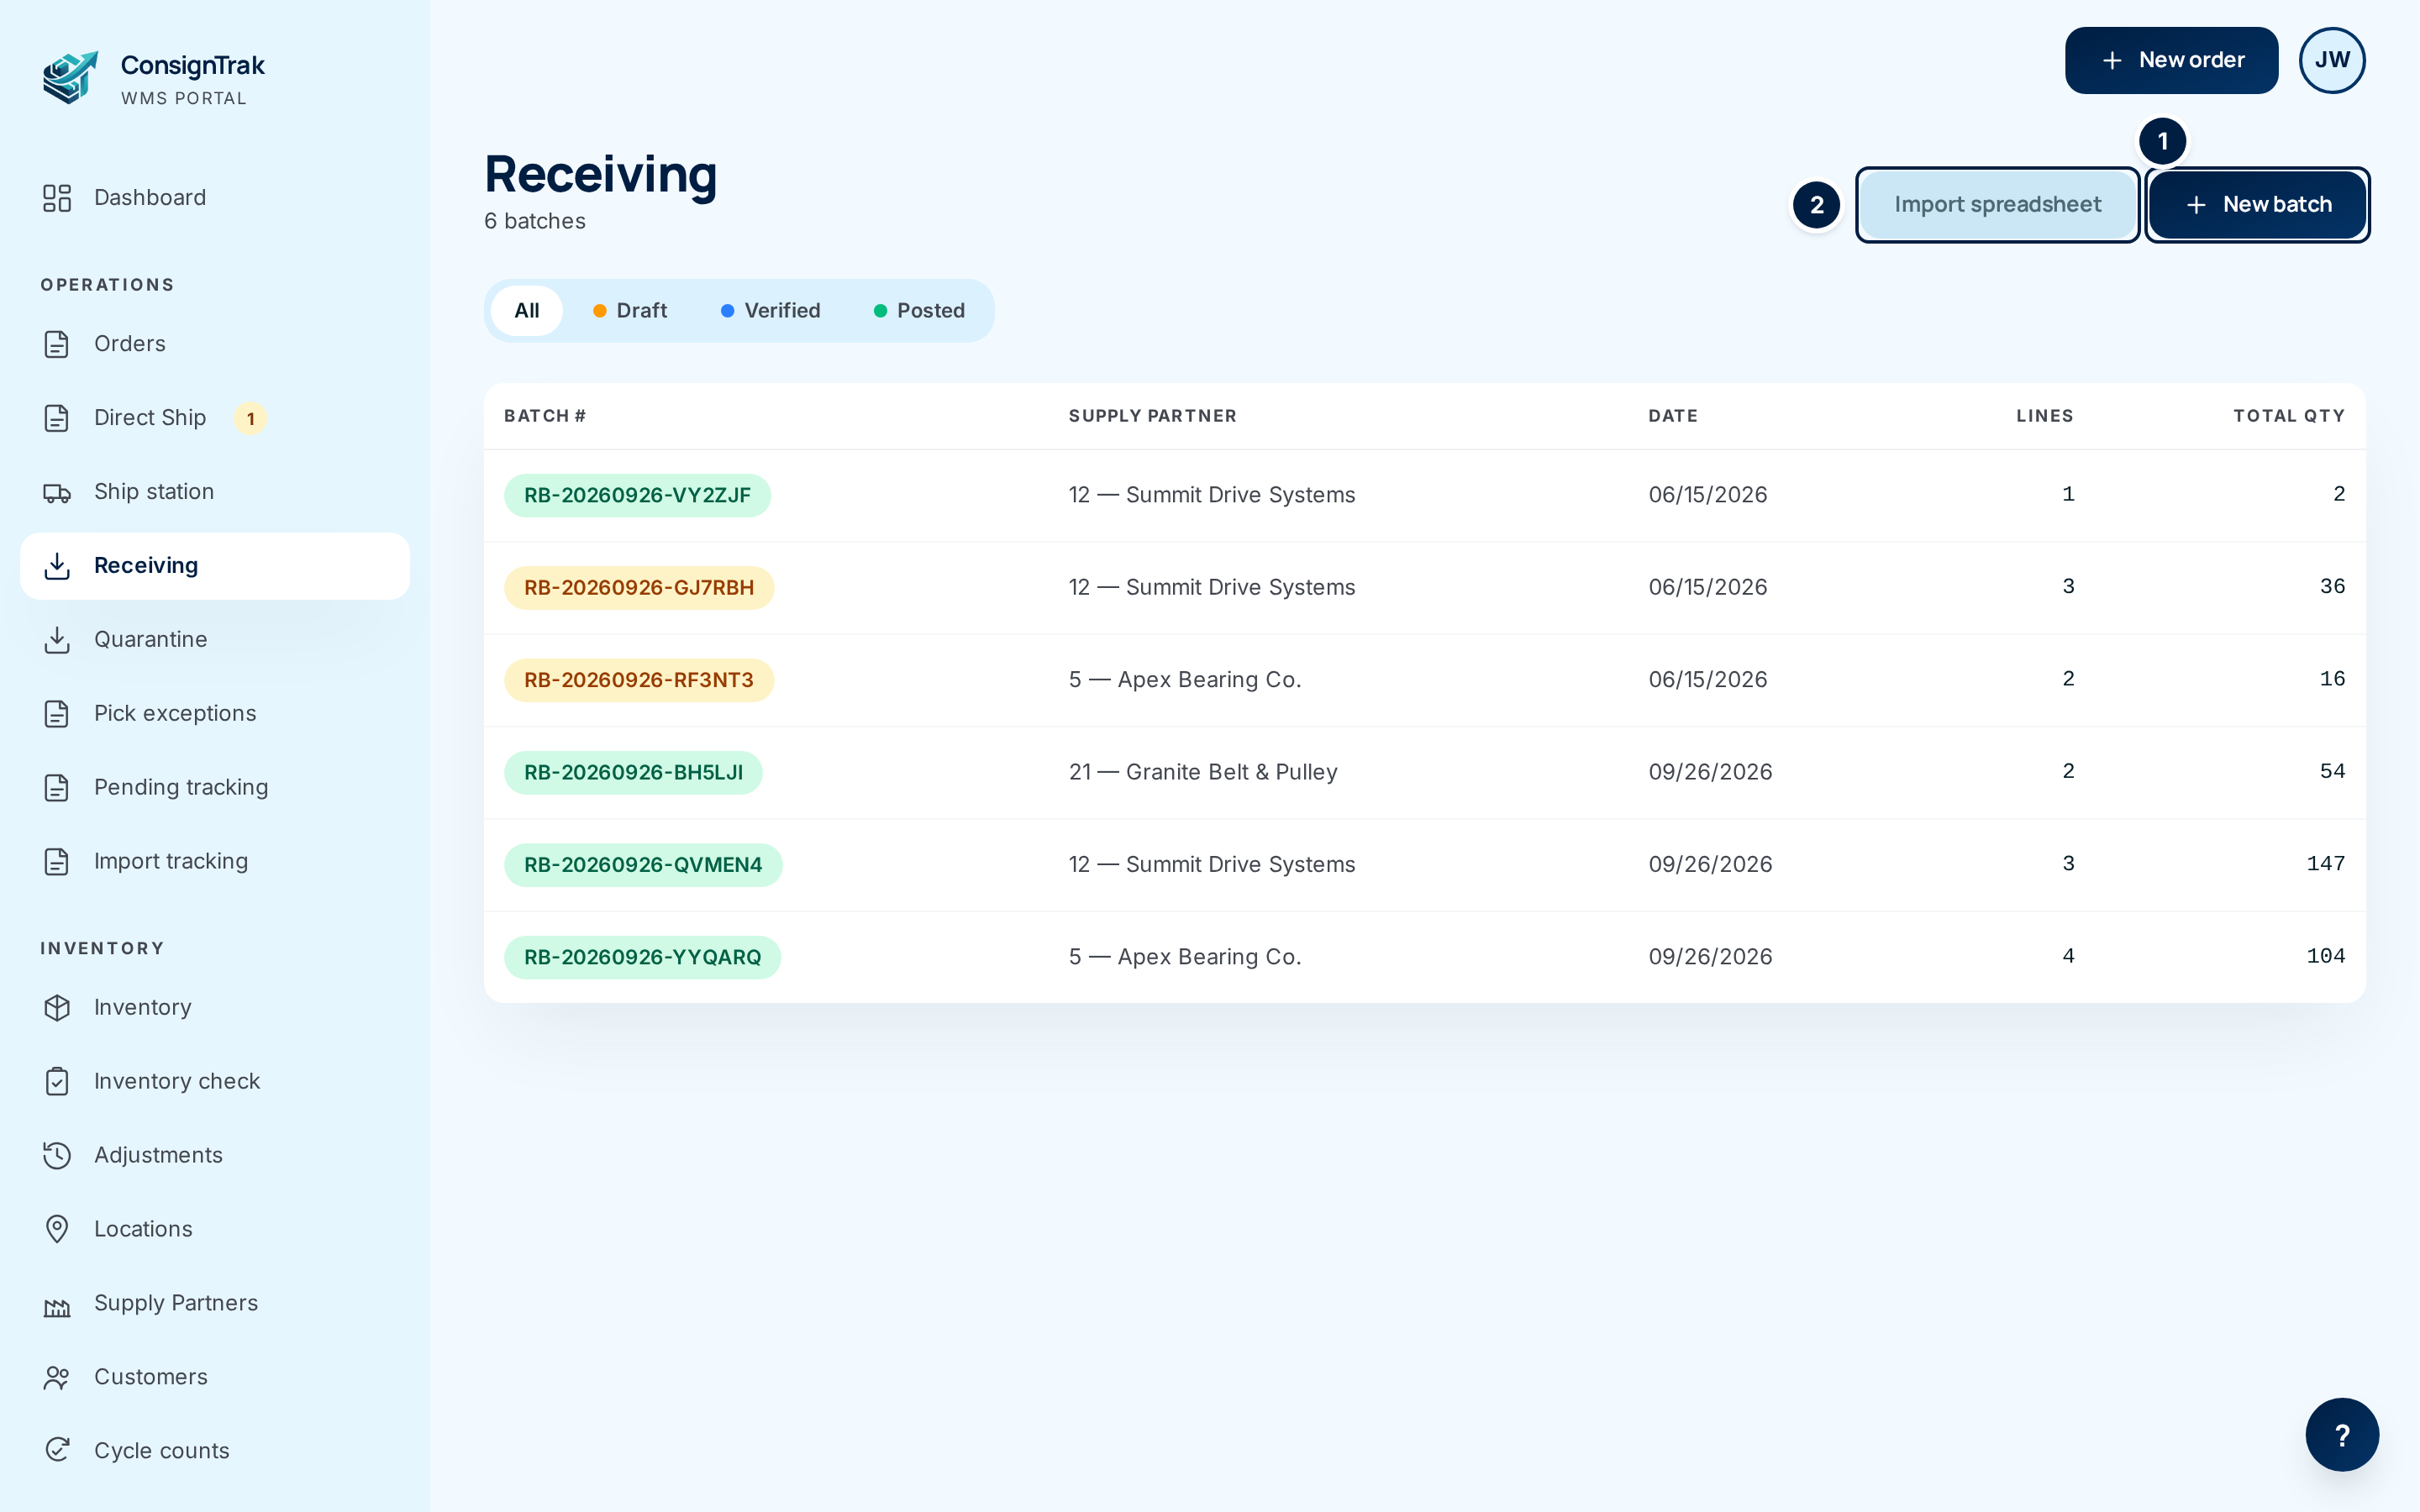
Open Receiving in the sidebar. The list shows every batch, newest first. Choose New batch ①. (Import spreadsheet ② is the other way in — see Importing a stock-transfer spreadsheet.)
-
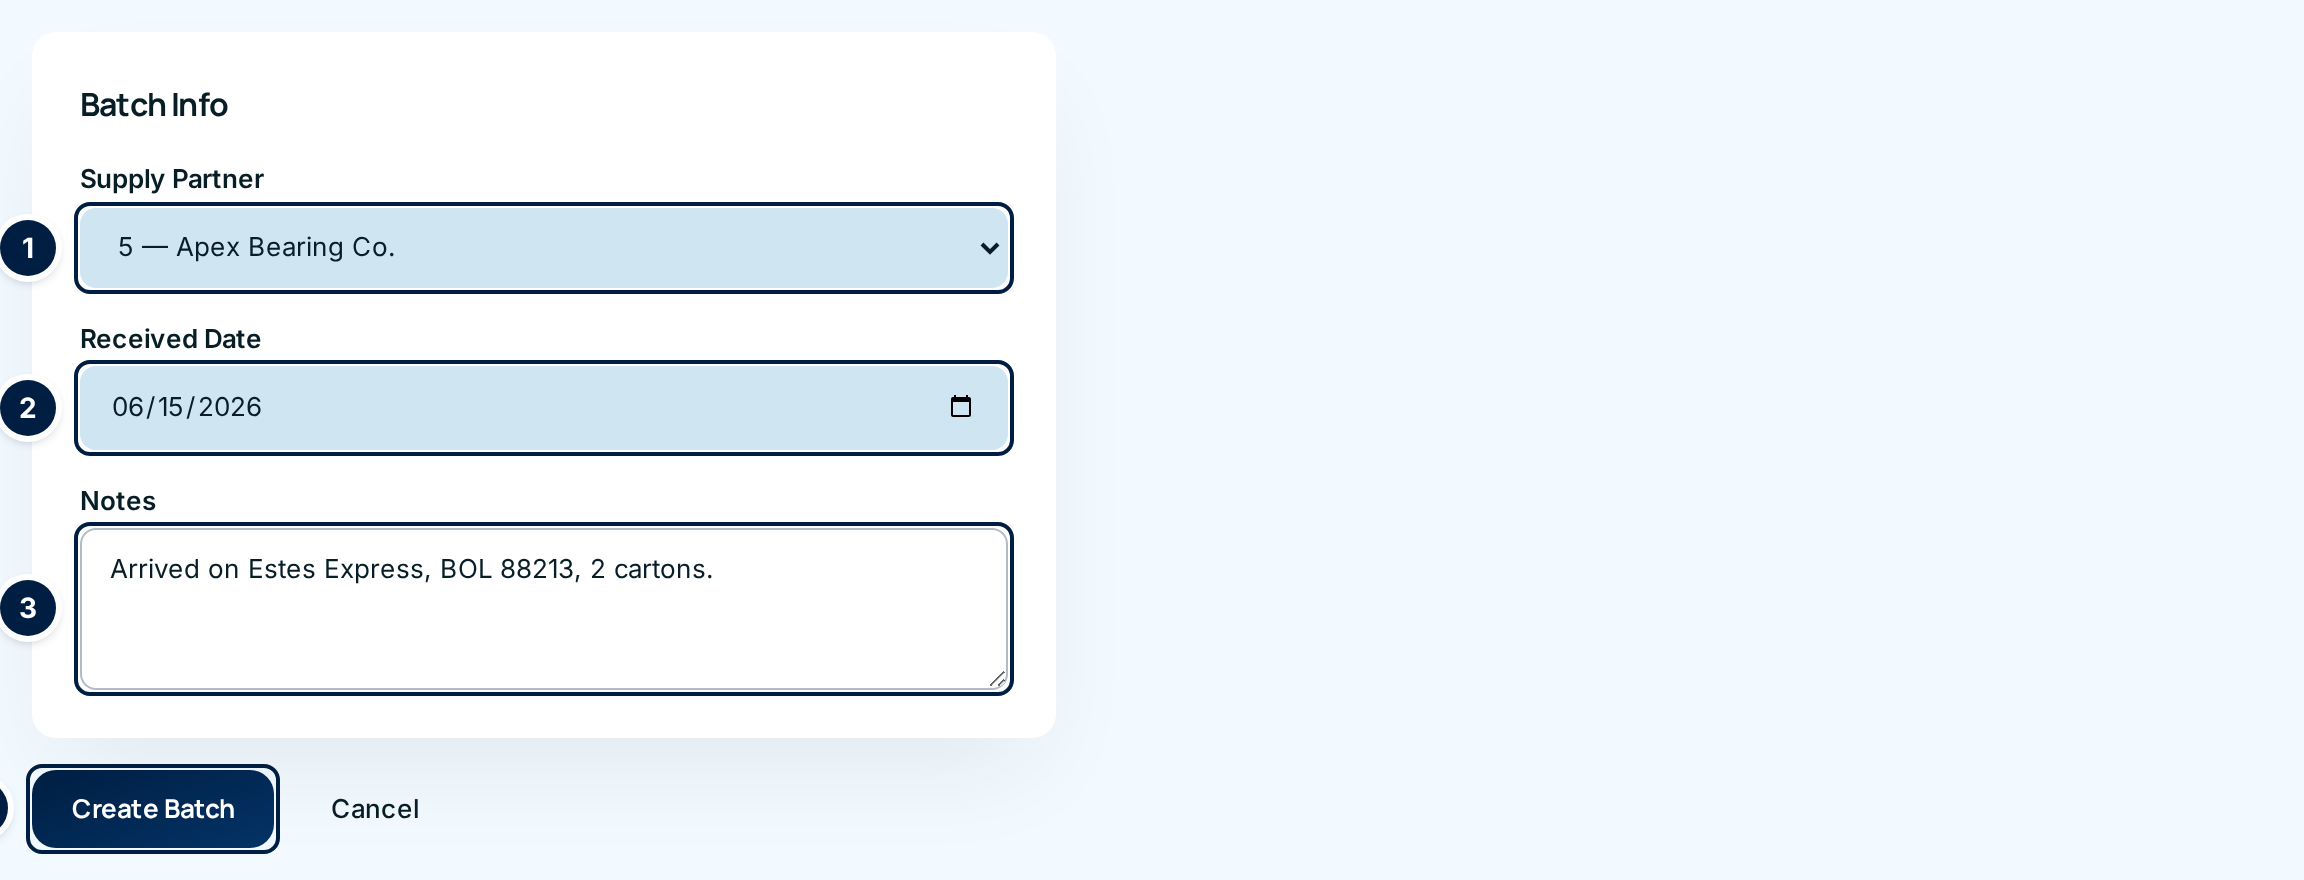
Fill in the batch. Choose the Supply Partner ① whose stock this is. Check the Received Date ② — it starts as today; change it if the truck came in earlier. Use Notes ③ for the carrier, bill-of-lading number, carton count, or anything else that ties this batch to the paperwork. Choose Create Batch ④.
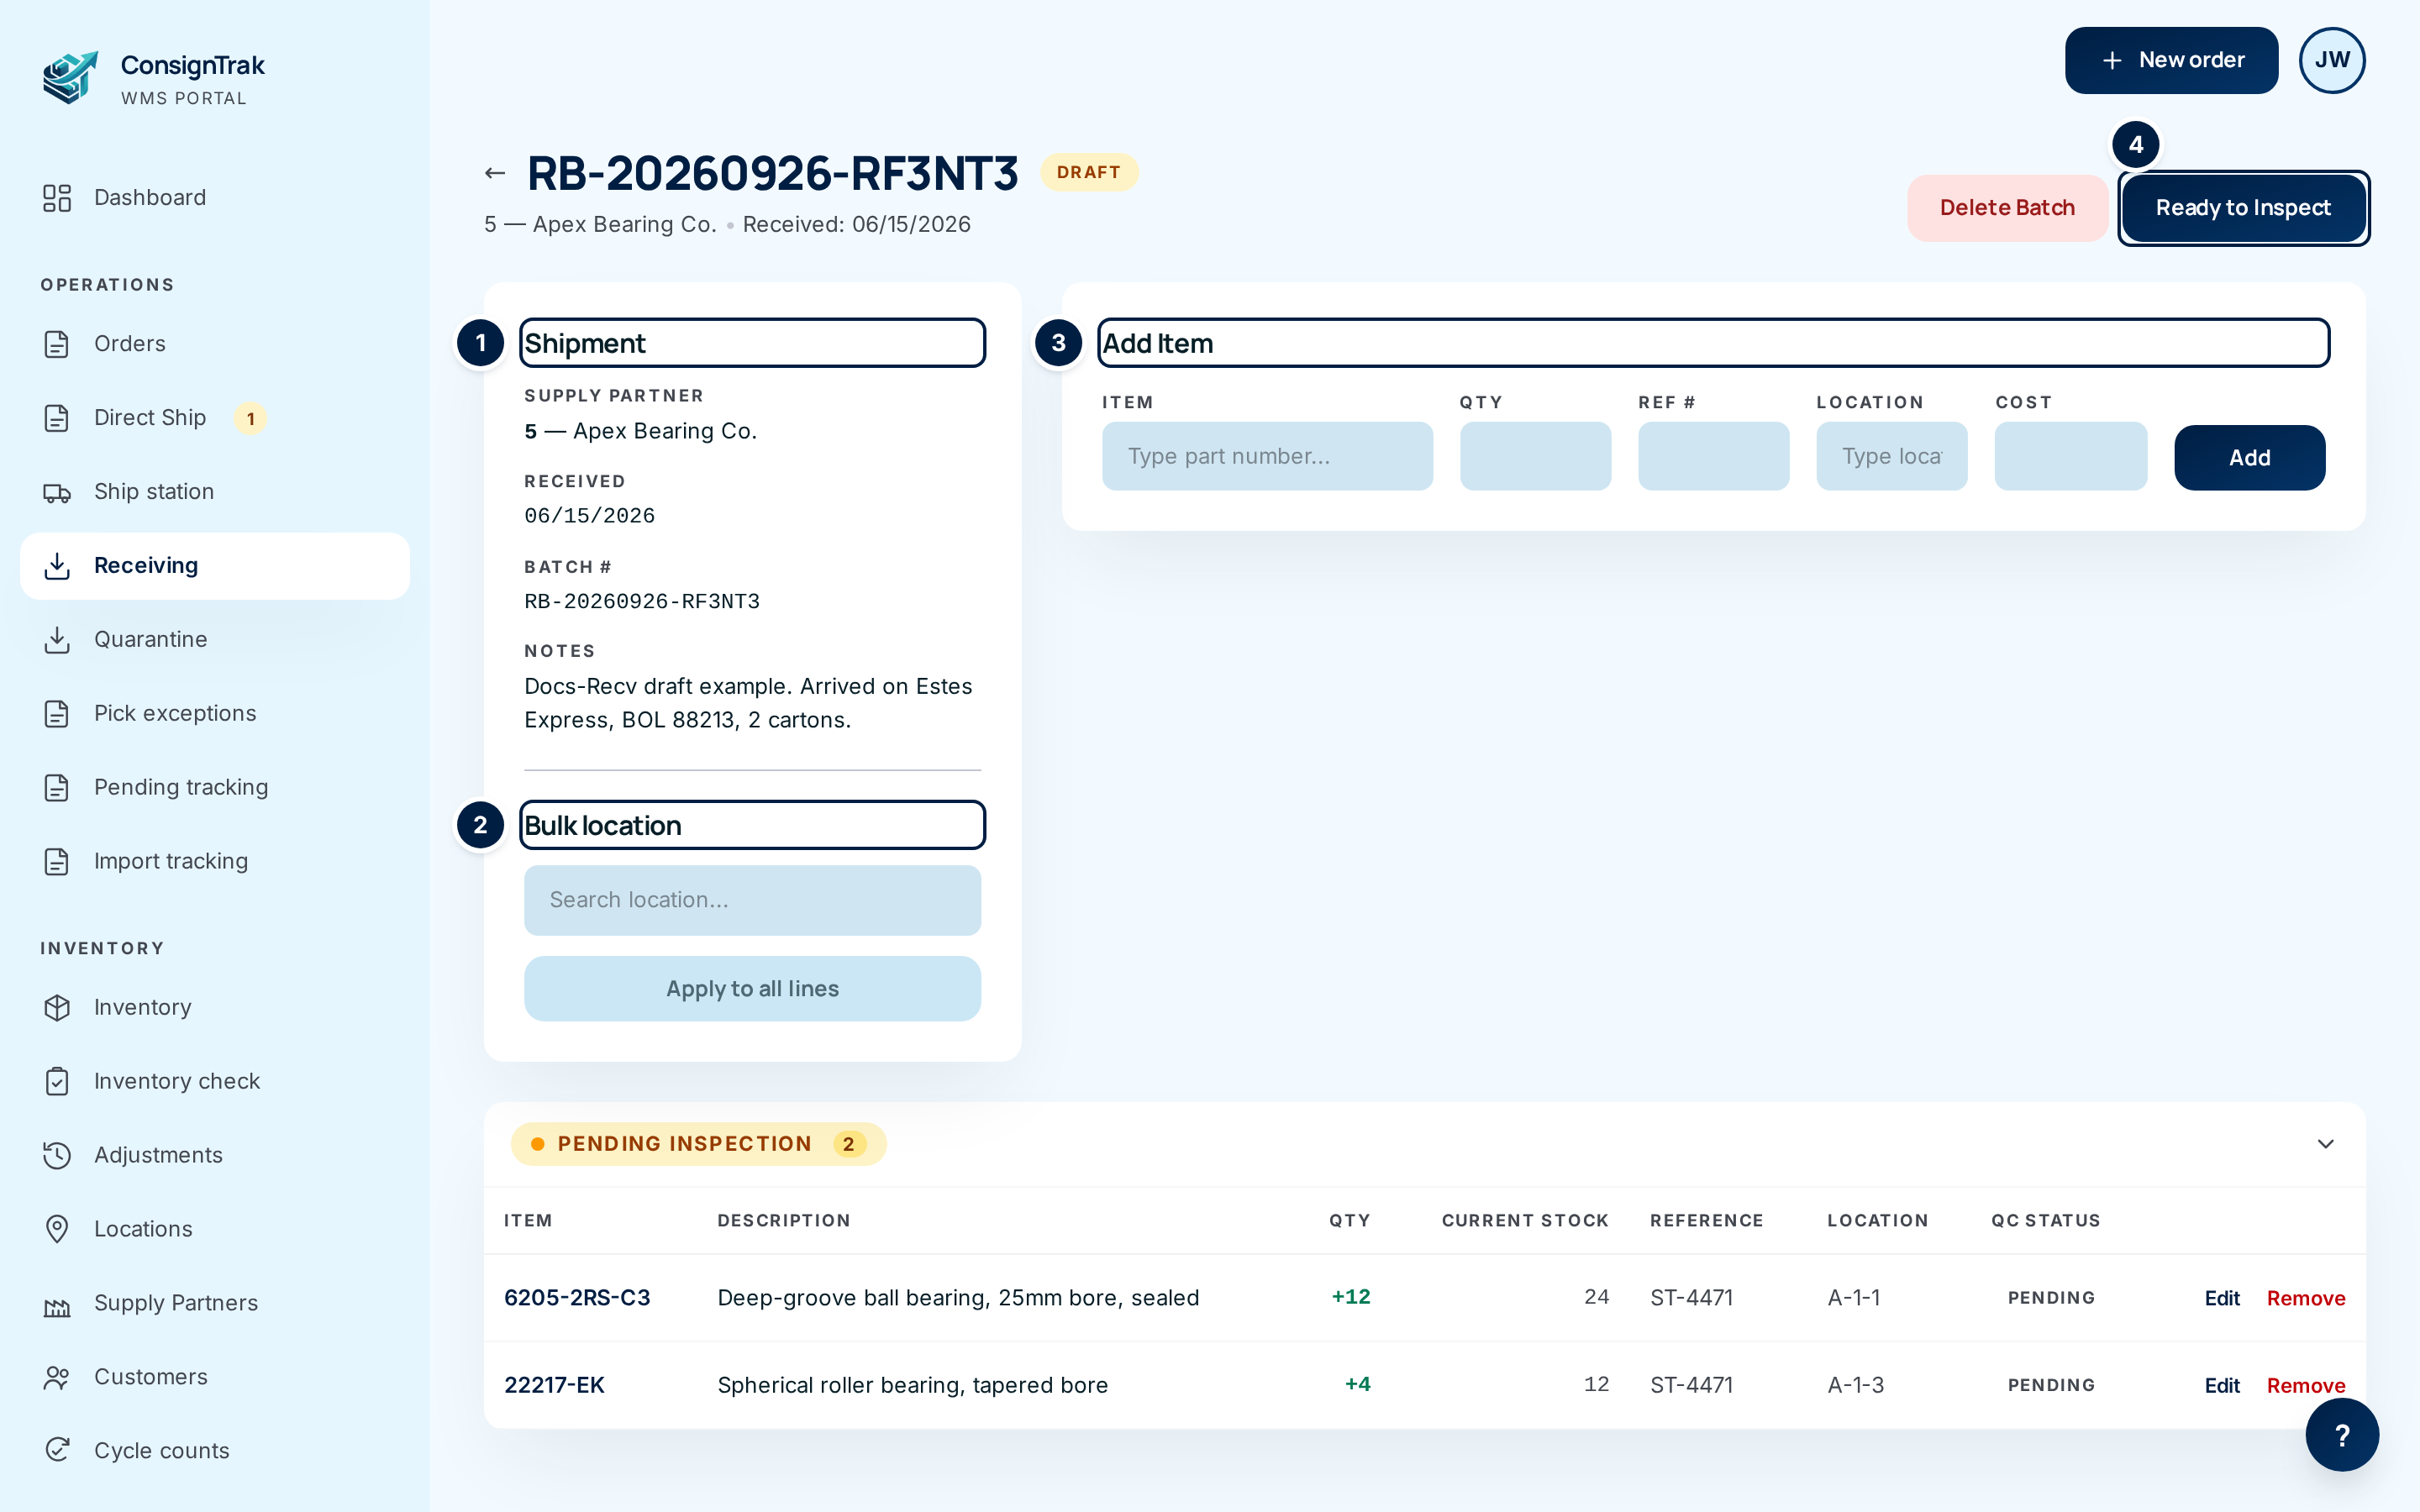
The batch opens as a Draft. The left panel ① shows the shipment details. Bulk location ② and Add Item ③ are how you fill it. Ready to Inspect ④ is the next step, once every line is in.
-
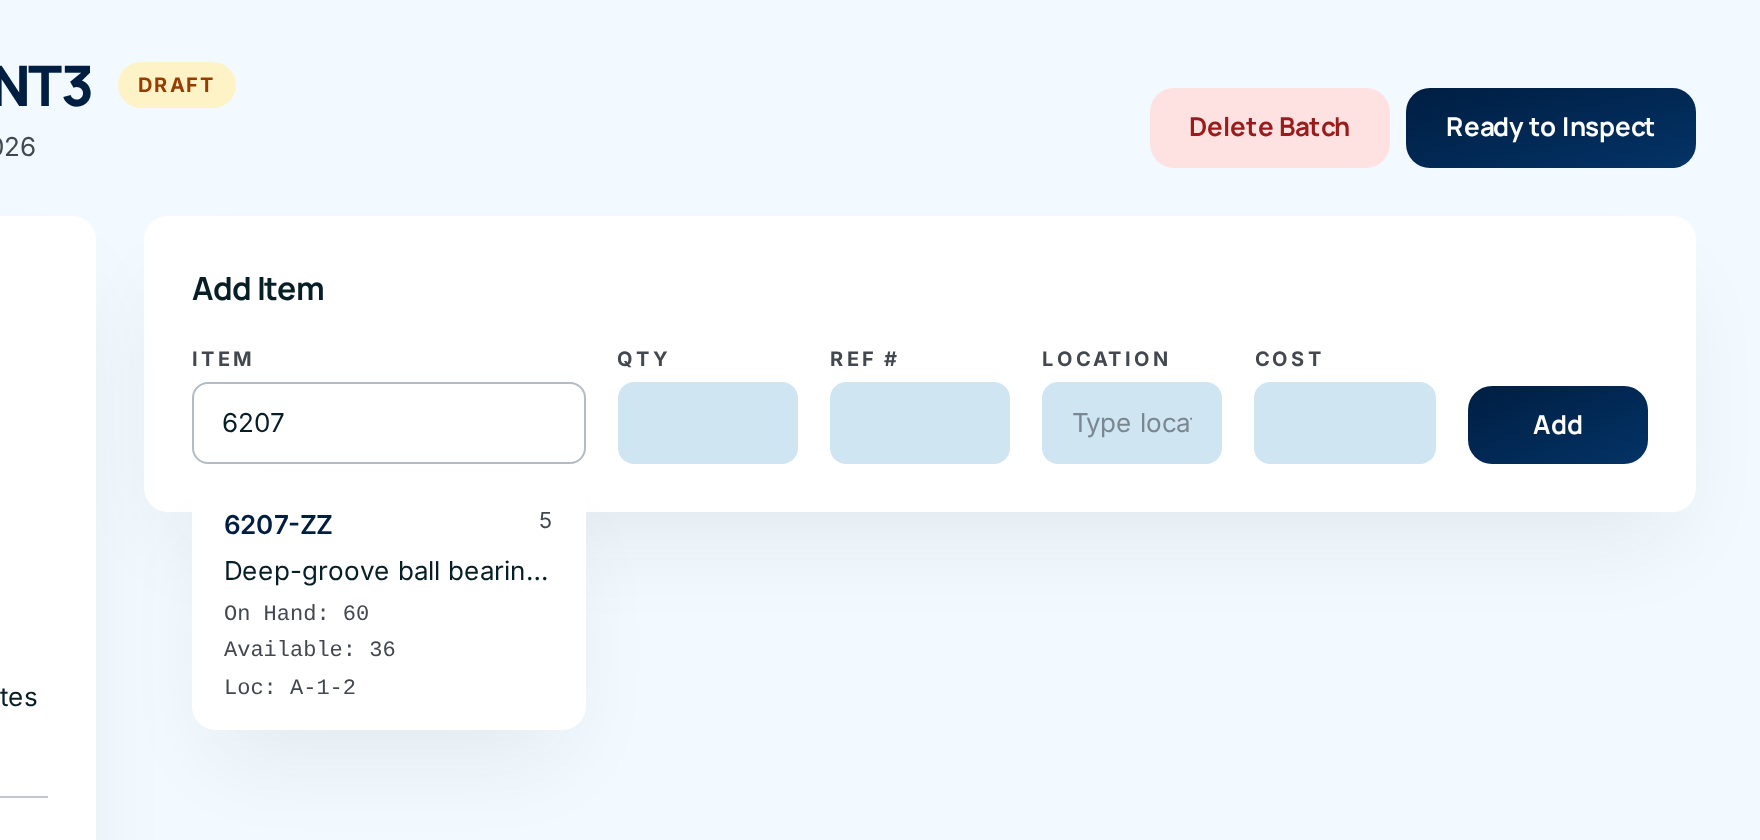
Add a line for each item. In Add Item, start typing the part number in Item and choose the item from the list. Dashes, spaces and capitals don't matter — "6207zz" finds 6207-ZZ. Each result shows its supply partner's manufacturer code, the on-hand and available counts, and its current location.
Then fill in:
- Qty — how many you counted. Always count what's in the box; don't copy the packing list.
- Ref # — the supply partner's stock-transfer number, PO or packing-list number, if there is one.
- Location — start typing a bin code and choose it. This is where the units will be once the batch is posted.
- Cost — only if the supply partner gave you a unit cost.
Choose Add. The line appears under Pending Inspection with a green +qty and the item's Current Stock beside it.
-
Put a whole shipment in one place (optional). If everything is going to the same bin or staging area, type it into Bulk location and choose Apply to all lines. It replaces the location on every line in the batch.
-
Fix a line before you move on. Choose Edit on the line to change its quantity, reference, location or cost, then Save. Choose Remove to take the line out of the batch.
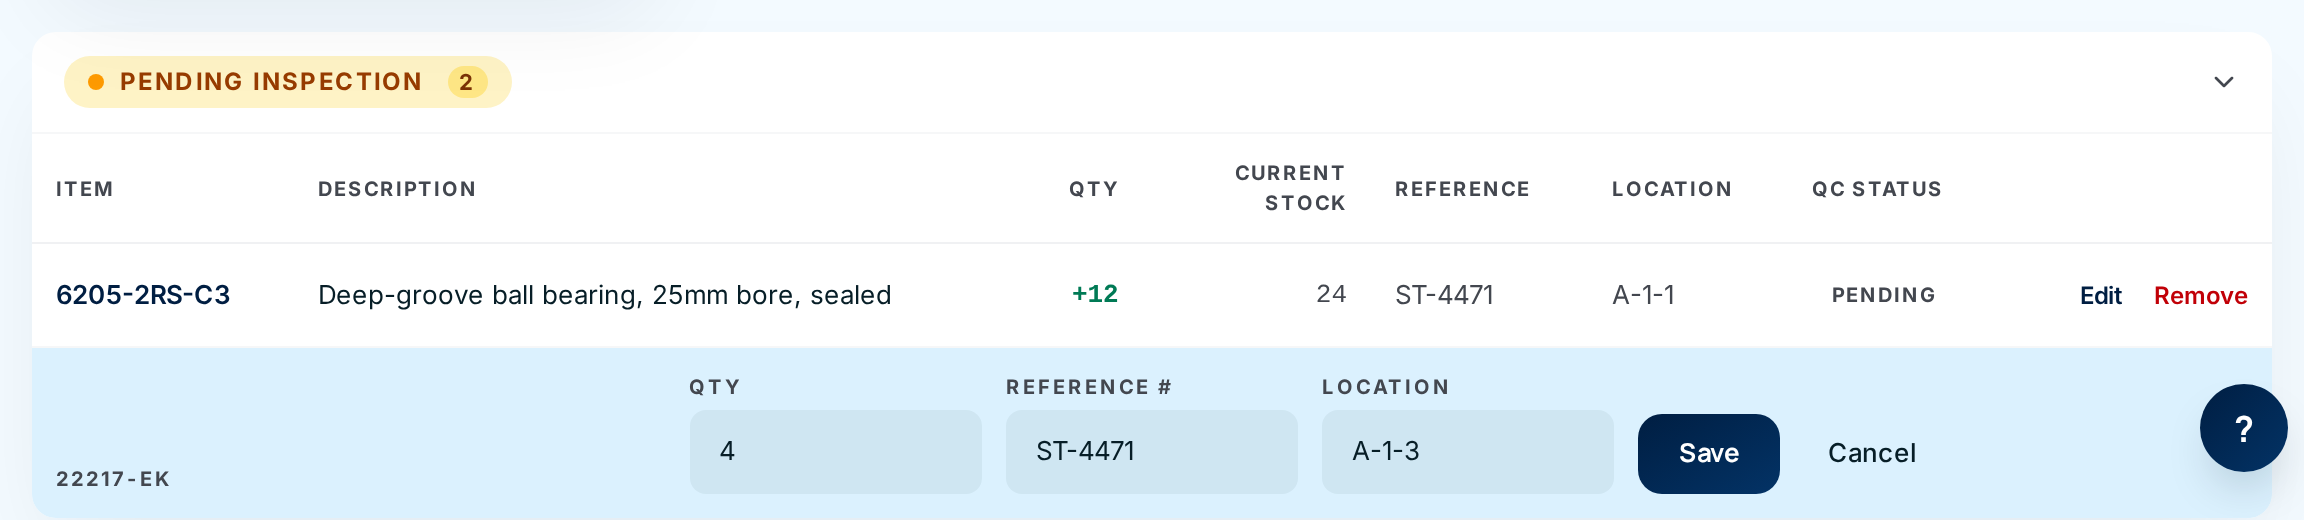
-
Send it to inspection. When every item is in, choose Ready to Inspect. The button turns amber and reads Click again to Confirm — click it a second time. The batch becomes Verified and the lines lock. Carry on with Inspecting a receiving batch.

Damage photos and paperwork are attached per line during inspection, not on the draft — see Inspecting a receiving batch. On a phone, the warehouse takes them with the camera as they count. For files that belong to the batch as a whole, see Documents.
Every field and option
Receiving list
| Field or control | What it means | Required | Default | What changes when you set it |
|---|---|---|---|---|
| Receiving / N batches | The page title and how many batches the current filter shows. | — | — | Read-only. |
| Import spreadsheet | Starts the spreadsheet import. Office and Administrator only; desktop only. | — | — | Opens the import. |
| New batch | Starts a batch you'll fill by hand. | — | — | Opens the New Receiving Batch form. |
| All, Draft, Verified, Posted | Status filters. See Receiving statuses. | — | All | Narrows the list. |
| Stuck only >Nh | Appears only when you arrive from the stuck alert. See Stuck receipts. | — | — | Click it to clear the filter. |
| Batch # | The batch's number, colored by status (amber Draft, blue Verified, green Posted, grey Voided). | — | — | Click the row to open the batch. |
| Supply Partner | Manufacturer code and name. | — | — | Read-only. |
| Date | The received date. | — | — | Read-only. |
| Lines / Total Qty | How many lines, and how many units across them. | — | — | Read-only. |
New Receiving Batch
| Field or control | What it means | Required | Default | What changes when you set it |
|---|---|---|---|---|
| ← (back arrow) | Back to the Receiving list. | — | — | Nothing is saved. |
| Batch Info | The form's heading. | — | — | — |
| Supply Partner | Whose stock this is, shown as "manufacturer code — name". | Yes | Select supply partner... | Only this supply partner's items can go on the batch. It can't be changed later. |
| Received Date | The day the shipment arrived. | Yes | Today | Becomes the item's "last received" date when the batch is posted. |
| Notes | Free text: carrier, bill of lading, carton count, packing-list reference. | No | — | Shown on the batch. Void reasons are added here later. |
| Create Batch | Saves the batch as a Draft. | — | — | Opens the new batch. |
| Cancel | Leaves without saving. | — | — | Back to the list. |
Draft batch
| Field or control | What it means | Required | Default | What changes when you set it |
|---|---|---|---|---|
| Batch number and Draft pill | The batch's number and status. | — | — | Read-only. |
| Shipment panel | Supply partner, Received date, Batch # and Notes. | — | — | Read-only; to change them, delete the draft and start again. |
| Bulk location — Search location... | A bin or staging area for every line. | Yes, to apply | — | — |
| Apply to all lines | Sets that location on every line. | — | — | Replaces each line's location. |
| Add Item — Item | The part number to add; type and choose from the list. | Yes | — | Picks the item. |
| Qty | Units counted. Whole numbers of 1 or more. | Yes | — | Becomes the line's received quantity. |
| Ref # | Transfer, PO or packing-list number. | No | — | Stored on the line and in the item's history. |
| Location | Where the units are put away. | No | — | Stock goes into this location when posted. Without one, the units count on the item but aren't in a bin. |
| Cost | Unit cost from the supply partner. | No | — | Updates the item's average and last cost when posted. |
| Add | Adds the line. | — | — | The line appears under Pending Inspection. |
| Delete Batch | Deletes the draft and all its lines. Asks you to click again (red). | — | — | Gone for good. Drafts only. |
| Ready to Inspect | Locks the lines for inspection. Asks you to click again. | — | — | Status becomes Verified. |
Lines table (all statuses)
| Field or control | What it means | Required | Default | What changes when you set it |
|---|---|---|---|---|
| Pending Inspection / Failed Inspection / Passed Inspection | The lines, grouped by inspection result, with a count. Passed starts folded; click to open. | — | — | Shows or hides the group. |
| Item (link) | The part number. | — | — | Opens the item. |
| Description | The item's description. | — | — | Read-only. |
| Qty | +N received. A small exp N under it is what the supply partner's spreadsheet said; it turns amber when your count differs. | — | — | Read-only here. |
| Current Stock | The item's on-hand quantity right now, before this batch. | — | — | Read-only. |
| Reference / Location | As entered on the line. | — | — | Read-only here. |
| New Cost | As entered; shown only when prices are turned on. | — | — | Read-only here. |
| QC Status | pending, passed, failed or partial, with passed/failed counts once inspected. Old batches may show waived. | — | pending | See Inspecting. |
| Edit | Opens the line for changes (Draft only). | — | — | Shows the edit row. |
| Remove | Takes the line off the batch straight away — no second click (Draft only). | — | — | The line is deleted. |
Editing a line (Draft only)
| Field or control | What it means | Required | Default | What changes when you set it |
|---|---|---|---|---|
| Part number | The item on this line; it can't be changed. Remove the line and add the right item instead. | — | — | — |
| Qty | Units counted. | Yes | Current value | Replaces the count. |
| Reference # | Transfer or PO number. | No | Current value | Replaces it. |
| Location | Put-away location. | No | Current value | Replaces it. |
| New Cost | Unit cost; shown only when prices are turned on. | No | Current value | Replaces it. |
| Save / Cancel | Keep or discard the changes. | — | — | — |
The controls for Verified and Posted batches are on Inspecting and Posting to inventory.
What happens next
- The batch stays a Draft until someone chooses Ready to Inspect. A draft changes nothing in stock: the item's on-hand, available count and location are exactly as they were.
- The batch shows on the phones too — the warehouse can count and add lines from the dock (see Receiving, quarantine & counts).
- A draft left alone too long shows up as a stuck receipt.
Common problems
"Supply partner and received date are required" — Choose a supply partner and check the date, then Create Batch again.
"Item is required" — You typed a part number but didn't choose it from the list. Type it again and click the item in the results.
"Quantity must be a positive number" — Enter a whole number of 1 or more.
"Failed to add line" — Most often, the item you chose belongs to a different supply partner. The search lists every supply partner's items, so check the manufacturer code in the result matches the batch. (This is tracked as issue #1517.) It also happens if the location you chose has been deactivated.
"Location is required" — You chose Apply to all lines without choosing a location from the list first.
The part isn't in the search at all. — The item hasn't been set up yet. Add it to the item master (see Inventory & items), then come back to the batch.
"Lines can only be edited on draft batches" / "Only draft batches can be deleted" — The batch has already moved to Verified. Choose Revert to Draft first (see Inspecting).